Web Browsers are the gateway and portals to the world of the internet. Every tool, service that can be assessed online can be reached through the web browser. In this tutorial we will explore how to build useful web browser extensions so that we can use them when navigation our web surfing. Think of browser extensions as plugins for our web navigation.
Developing a Mozilla Firefox extension is more approachable than ever, thanks to the standardized WebExtensions API and a rich set of official guides. This tutorial walks you through creating a feature-rich text analyzer extension, covering manifest configuration, background/context menu logic, notifications, and even a sidebar interface—all while focusing on Firefox compatibility.
Understanding Firefox Extension Architecture
At its core, a Firefox extension (or WebExtension) is a packaged collection of files that work together to add features to the browser. The essential components are:
- manifest.json: The configuration and metadata file for your extension.
- Background scripts: Handle browser events and persistent logic.
- Content scripts: Interact with web page contents.
- UI files (popup/sidebar): Define user-facing interfaces.
- Other resources: Icons, images, and other static files.
The Manifest File: The Extension’s Blueprint
Every extension must include a manifest.json file—this tells Firefox about your extension, permissions, and which files to load. This is also the same in case you are using Chrome Extension
Sample manifest.json for a Text Analyzer:
{
  "manifest_version": 3,
  "name": "Text Analyzer",
  "version": "1.0",
  "description": "Analyzes selected text for keywords, tokens, reading time, sentiment, and visualizations",
  "permissions": [
    "activeTab",
    "contextMenus",
    "storage",
    "scripting",
    "notifications"
  ],
  "background": {
    "scripts": ["background.js"]
  },
  "content_scripts": [
    {
      "matches": [""],
      "js": ["content.js"]
    }
  ],
  "action": {
    "default_popup": "popup.html",
    "default_icon": {
      "16": "images/icon.png",
      "48": "images/icon.png",
      "128": "images/icon.png"
    }
  },
  "sidebar_action": {
    "default_title": "Text Analyzer Sidebar",
    "default_panel": "sidebar.html",
    "default_icon": {
      "16": "images/icon16.png",
      "32": "images/icon32.png"
    }
  },
  "icons": {
    "16": "images/icon16.png",
    "48": "images/icon48.png",
    "128": "images/icon128.png"
  },
  "web_accessible_resources": [
    {
      "resources": ["AFINN-111.json"],
      "matches": [""]
    }
  ],
  "browser_specific_settings": {
    "gecko": {
      "id": "text-analyzer@example.com",
      "strict_min_version": "109.0"
    }
  }
}
Note: Do not list "sidebarAction" as a permission; it’s only a manifest key (sidebar_action) We use sidebar if you want to have a sidebar automatically open for your extension in the web browser.
Background Scripts: Adding Context Menu & Notifications
Background scripts are where you listen for browser events—like right-clicking to analyze selected text—and perform core logic
background.js:
if (typeof browser === "undefined") {
var browser = chrome; // For cross-browser support if needed
}
browser.runtime.onInstalled.addListener(() => {
browser.contextMenus.create({
id: "analyze-text",
title: "Analyze selected text",
contexts: ["selection"]
});
});
browser.contextMenus.onClicked.addListener(async (info, tab) => {
if (info.menuItemId === "analyze-text" && info.selectionText) {
await browser.storage.local.set({ selectedText: info.selectionText });
// Show notification to guide user
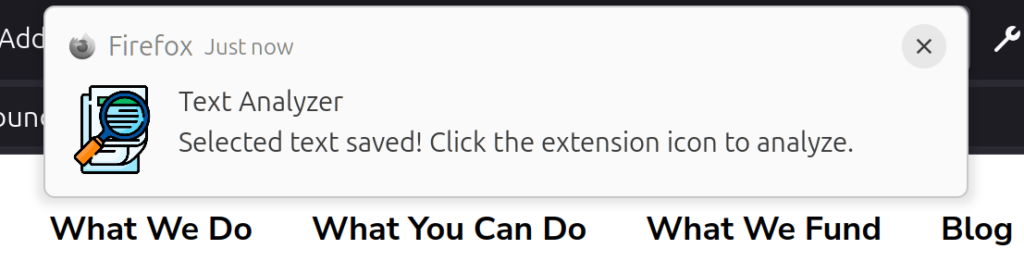
browser.notifications.create({
"type": "basic",
"iconUrl": browser.runtime.getURL("images/icon48.png"),
"title": "Text Analyzer",
"message": "Selected text saved! Click the extension icon or check the sidebar to analyze."
});
// Open the sidebar (Firefox only)
if (browser.sidebarAction && browser.sidebarAction.open) {
browser.sidebarAction.open();
}
}
});This script creates a context menu, saves selected text, notifies the user, and opens the sidebar if available.
Content Scripts: Optional Interaction with Web Pages
Content scripts allow your extension to interact directly with the DOM of web pages. For this project, you may use them to collect, highlight, or manipulate data as needed.
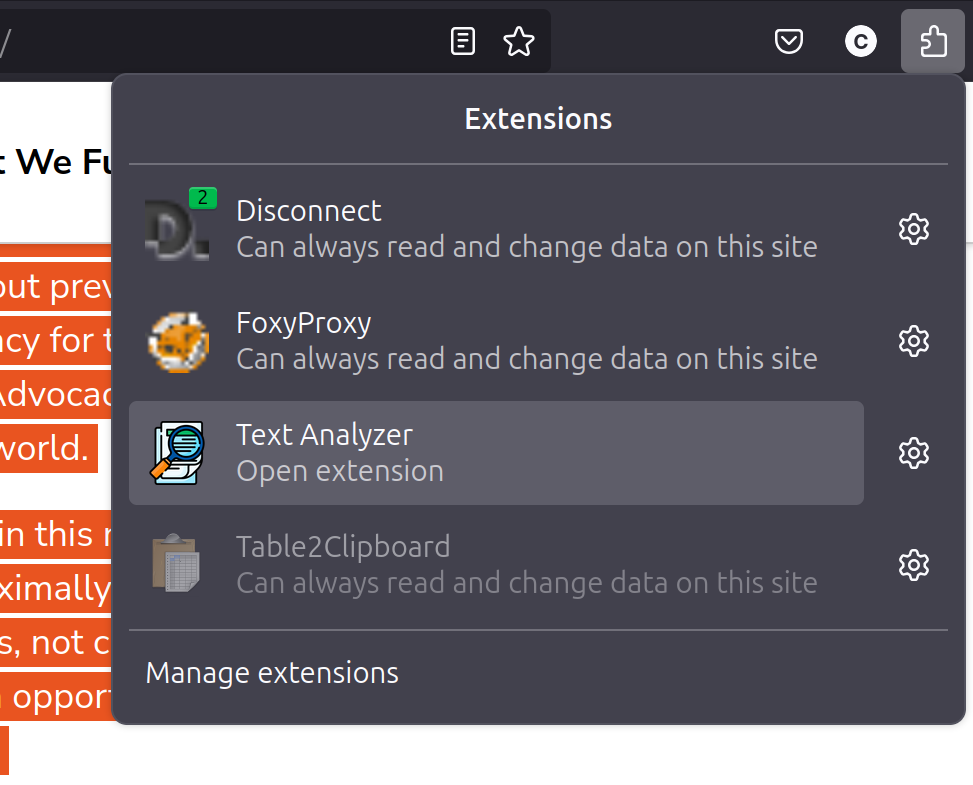
The Popup: User-Initiated Analysis
The popup UI appears when the user clicks the extension icon. You cannot open the popup programmatically in Firefox; the user must click the icon. In Chrome the popup can automatically be opened.
popup.html (example):
<!DOCTYPE html>
<html>
<head>
  <meta charset="utf-8">
  <title>Text Analyzer</title>
</head>
<body>
  <textarea id="user-text"></textarea>
  <button id="analyze-btn">Analyze</button>
  <script src="popup.js"></script>
</body>
</html>
popup.js (core snippet):
document.addEventListener('DOMContentLoaded', async () => {
  const result = await browser.storage.local.get(['selectedText']);
  if (result.selectedText) {
    document.getElementById('user-text').value = result.selectedText;
    await browser.storage.local.remove('selectedText');
    analyzeAndDisplay(result.selectedText);
  }
});

document.getElementById('analyze-btn').addEventListener('click', () => {
  const text = document.getElementById('user-text').value.trim();
  if (text) analyzeAndDisplay(text);
});
The popup loads the selected text from storage and enables the user to analyze it.
6. The Sidebar: Auto-Open Analysis UI
Unlike popups, a sidebar can be opened programmatically in Firefox. This makes it ideal for showing analysis results automatically after the user selects text and chooses your context menu item.
sidebar.html:
<!DOCTYPE html>
<html>
<head>
  <meta charset="utf-8">
  <title>Text Analyzer Sidebar</title>
</head>
<body>
  <textarea id="user-text"></textarea>
  <div id="analysis-output"></div>
  <script src="sidebar.js"></script>
</body>
</html>
sidebar.js:
document.addEventListener('DOMContentLoaded', async () => {
  const result = await browser.storage.local.get(['selectedText']);
  const text = result.selectedText || "";
  document.getElementById('user-text').value = text;
  if (text) {
    analyzeAndDisplay(text); // Your analysis function
    await browser.storage.local.remove('selectedText');
  }
});
Now, analyzing selected text is seamless: use the context menu and the extension’s sidebar opens with instant feedback.
Common Pitfalls & Firefox-Specific Tips
Background Scripts in Manifest V3
- Firefox (as of mid-2025) does not support
background.service_worker(MV3) for extensions. - Use
"background": { "scripts": ["background.js"] }instead of a service worker in your manifest when targeting Firefox.
Popup Limitations
- You cannot programmatically open the popup (the action UI) in Firefox. The popup opens only when the user clicks the extension icon.
- If you want instant feedback after a context menu click, use a sidebar or notifications, not the popup.
Sidebar Details
- The sidebar opens automatically the first time after installation. Users can close it, and Firefox remembers their choice next time.
- You cannot programmatically close the sidebar, but you can open it using
browser.sidebarAction.open()after a context menu action.
Permissions
- Don’t add
"sidebarAction"to thepermissionsarray; it’s not a permission, just a manifest key. - Only add permissions required by your extension, such as
"contextMenus","storage", and"notifications".
WebExtension API Namespace
- Use
browser.(instead ofchrome.) for Firefox, as it provides Promise-based APIs, making code cleaner and easier to maintain. - For cross-browser (Chrome+Firefox) support, you can use Mozilla’s webextension-polyfill.
Testing and Debugging Your Extension
- Loading the Extension Temporarily:
- Go to
about:debugging#/runtime/this-firefoxin Firefox. - Click “Load Temporary Add-on…” and select any file in your extension directory (usually
manifest.json).
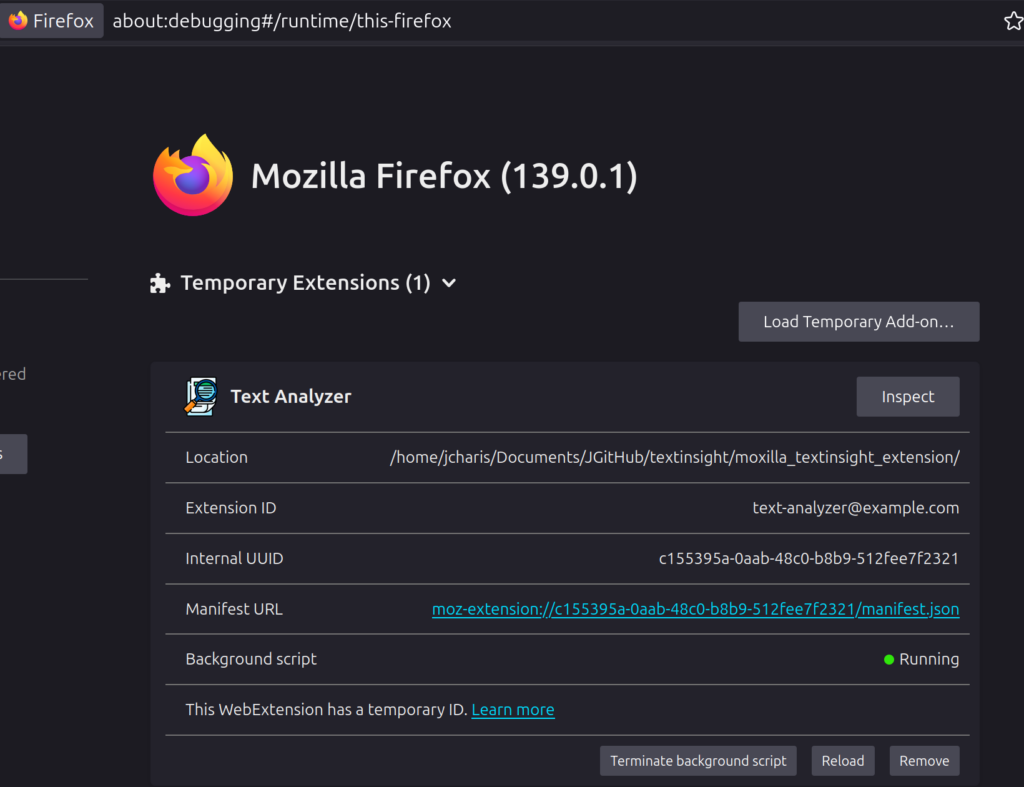
- Debugging:
- Use the console in the same
about:debuggingpanel to see extension errors or logs from background and popup/sidebar scripts. - To reload your extension after code changes, simply click the “Reload” button next to your extension in
about:debugging.
- Testing Functionality:
- Try selecting text on a web page, right-click, and ensure your context menu and sidebar work as expected.
- Click the extension icon—ensure the popup loads and shows analysis if text was previously selected.
9. Packaging and Publishing Your Extension
- When your extension is ready, package the entire directory as a
.zipfile. - Go to addons.mozilla.org Develop Tools to submit your extension for review and publication.
- Read the Publishing guide for details on submission, privacy requirements, and best practices.
Summary Table: Key Files for a Firefox Extension
| File Name | Purpose |
|---|---|
| manifest.json | Metadata and config; references other files |
| background.js | Event handling, context menus, notifications |
| content.js | Interacts with websites (optional) |
| popup.html/.js | Popup UI logic (analyses on user icon click) |
| sidebar.html/.js | Sidebar UI logic (auto-open on context actions) |
| icons/ | Icons for extension and UI |
| Other resources | (e.g., AFINN-111.json for sentiment) |
Conclusion
Building a Firefox extension can be both fun and powerful, giving you the ability to add unique functionality to your browser. In this tutorial, you learned how to:
- Set up your extension’s manifest for Firefox
- Use background scripts for context menus and notifications
- Create user interfaces with popups and sidebars
- Overcome Firefox-specific limitations (such as popup restrictions)
- Package, test, and prepare your extension for users
Whether you’re analyzing text, translating, or adding new browsing tools, these foundations will help you build robust, user-friendly Firefox add-ons.
Happy coding, and make your own mark on the (Firefox) web!