Google Chrome extensions are powerful tools to personalize and enhance your browsing experience. In this tutorial, we’ll walk you through building a text analyzer Chrome extension similar to our prior Firefox example, but tailored to Chrome’s requirements—including use of Manifest V3, background service workers, popups, context menus, and notifications.
Chrome Extension Basics: What Files Do You Need?
Every Chrome extension includes several standard files:
- manifest.json: The configuration file that tells Chrome about your extension’s permissions, resources, and features.
- Background service worker: Handles persistent logic and browser events.
- Content scripts: (Optional) Run in the context of web pages.
- UI (popup) files: HTML and JS for popups, side-panels, or options.
- Other resources: Icons, data files, etc.
Writing the Manifest (manifest.json)
Chrome currently requires Manifest V3 for new extensions. Your manifest defines everything about the extension: name, permissions, files in use, and more.
Example manifest.json:
{
  "manifest_version": 3,
  "name": "Text Analyzer",
  "version": "1.0",
  "description": "Analyzes selected text for keywords, reading time, sentiment, and visualizations",
  "permissions": ["activeTab", "contextMenus", "storage", "notifications", "scripting"],
  "action": {
    "default_popup": "popup.html",
    "default_icon": {
      "16": "images/icon16.png",
      "48": "images/icon48.png",
      "128": "images/icon128.png"
    }
  },
  "background": {
    "service_worker": "background.js"
  },
  "content_scripts": [
    {
      "matches": [""],
      "js": ["content.js"]
    }
  ],
  "icons": {
    "16": "images/icon16.png",
    "48": "images/icon48.png",
    "128": "images/icon128.png"
  },
  "web_accessible_resources": [
    {
      "resources": ["AFINN-111.json"],
      "matches": [""]
    }
  ]
}
Background: Adding Context Menu & Notifications
In Manifest V3, background scripts run as service workers. This is different from Firefox, which uses persistent background pages.
background.js:
chrome.runtime.onInstalled.addListener(() => {
  chrome.contextMenus.create({
    id: "analyze-text",
    title: "Analyze selected text",
    contexts: ["selection"]
  });
});

chrome.contextMenus.onClicked.addListener((info, tab) => {
  if (info.menuItemId === "analyze-text" && info.selectionText) {
    chrome.storage.local.set({ selectedText: info.selectionText }, () => {
      chrome.action.openPopup(); // In Chrome MV3, you can open the popup programmatically.
      chrome.notifications.create({
        type: "basic",
        iconUrl: chrome.runtime.getURL("images/icon48.png"),
        title: "Text Analyzer",
        message: "Selected text saved. Popup opened for analysis."
      });
    });
  }
});
Note: In Chrome MV3, you can use chrome.action.openPopup() to programmatically open the popup UI after a context menu action—a key difference vs. Firefox[3][4].
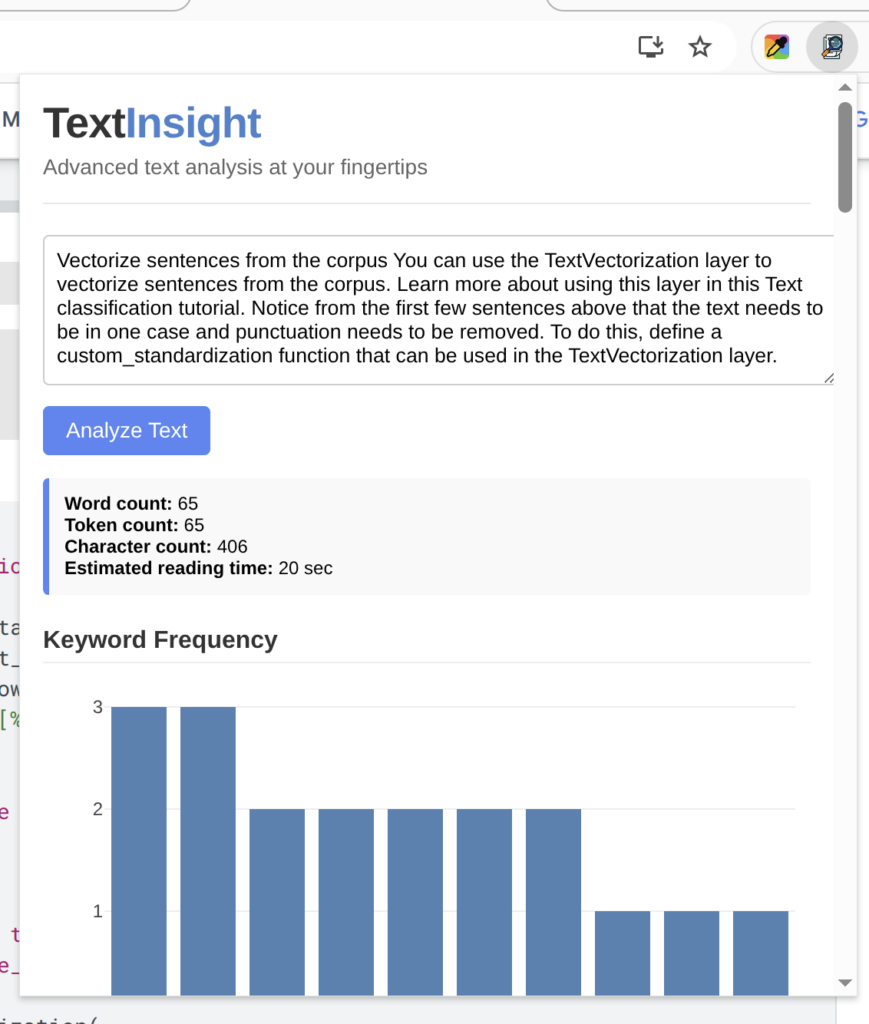
Popup UI: Handling Analysis in the Popup
The popup is where users interact directly with your extension. The following shows how to load the last selected text and trigger your analysis logic.
popup.html:
<!DOCTYPE html>
<html>
<head>
  <meta charset="utf-8">
  <title>Text Analyzer</title>
</head>
<body>
  <textarea id="user-text"></textarea>
  <button id="analyze-btn">Analyze</button>
  <script src="popup.js"></script>
</body>
</html>
popup.js (core logic):
document.addEventListener('DOMContentLoaded', () => {
  // Load dictionary (if using AFINN sentiment or similar)
  fetch(chrome.runtime.getURL('AFINN-111.json'))
    .then(res => res.json())
    .then(json => {
      window.afinn = json;
      chrome.storage.local.get(['selectedText'], (result) => {
        if (result.selectedText) {
          document.getElementById('user-text').value = result.selectedText;
          analyzeAndDisplay(result.selectedText); // Your analysis function
          chrome.storage.local.remove('selectedText');
        }
      });
    });

  document.getElementById('analyze-btn').addEventListener('click', () => {
    const text = document.getElementById('user-text').value.trim();
    if (text) analyzeAndDisplay(text);
  });
});
Notifications
Chrome’s notifications API lets you provide visual feedback to the user. Just ensure you’ve requested "notifications" permission in the manifest.
Example (in background.js, as above):
chrome.notifications.create({
  type: "basic",
  iconUrl: chrome.runtime.getURL("images/icon48.png"),
  title: "Text Analyzer",
  message: "Selected text saved. Popup opened for analysis."
});
Content Scripts (Optional)
If you want your extension to manipulate or analyze the actual content of web pages directly, content scripts are your friend.
content.js: (example snippet)
let selectedText = "";

chrome.runtime.onMessage.addListener((request, sender, sendResponse) => {
  if (request.action === "analyze") {
    selectedText = request.text;
    analyzeText(selectedText); // Your text analyzer logic
  }
  return true;
});

document.addEventListener('mouseup', () => {
  const selection = window.getSelection();
  selectedText = selection.toString().trim();
});
Testing and Publishing Your Chrome Extension
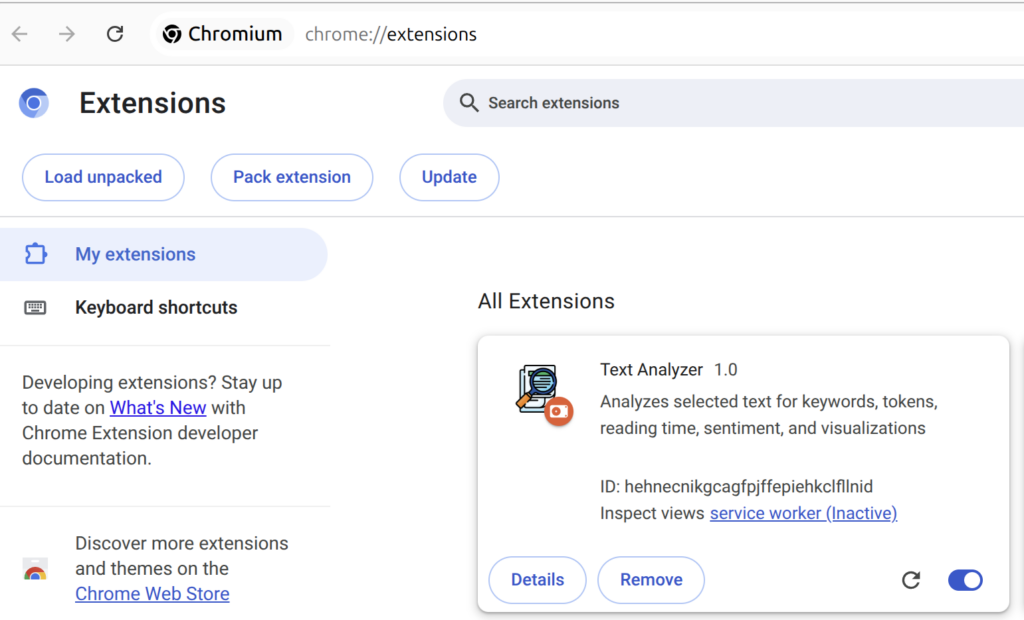
Testing Locally
- Go to
chrome://extensions/ - Enable “Developer mode”
- Click “Load unpacked,” then select your extension’s directory.
- Use the extension, inspect popups/console logs, and debug.
Packaging and Publishing
- Zip your extension files.
- Submit your extension via the Chrome Web Store Developer Dashboard.
- Complete required privacy fields and descriptions before publishing.
Key Differences and Cross-Browser Tips
- Chrome MV3 uses background service workers, not background pages.
- You can open popups programmatically in Chrome (but not Firefox).
- Sidebars are not natively supported in Chrome; use popups or a new tab for extended UI.
- Most WebExtension APIs are similar