One of the most common tools used by most Data Scientists when doing a project is a Jupyter Notebook – which can be used primarily with Julia (the Ju in JUpyter) Python (the Pyt In JuPYTer) and R (the R in the JupyteR). It quite useful and has a large community.
Let us see another alternative to Jupyter Notebook primarily for Julia – Pluto Notebooks.
Pluto Notebooks is a reactive form of notebook that is lightweight, simple and easy to use.
As a reactive form of notebook it means that when you change a variable or a function Pluto automatically updates all affected cells, which is quite fascinating.
Let us see how to work with Pluto Notebooks
Installation
To install Pluto.jl you can use the Pkg Mode “]” from the REPL or using the Pkg Module.
(@v1.5) pkg> add Pluto Updating registry at~/.julia/registries/GeneralUpdating git-repohttps://github.com/JuliaRegistries/General.gitResolving package versions…
using Pkg
Pkg.add("Pluto")
To Start Your Pluto Notebook you can import and run Pluto which serve your Pluto Notebook Instance on a localhost.
import Pluto
Pluto.run()

Working with PlutoUI
Just like Jupyter Notebook there are several widgets we can use such as ipython widget (ipwidgets) or panel etc, we can use widgets in Pluto Notebook.
To be able to use widgets in Pluto Notebook, you will need to add PlutoUI.jl to your Julia Box. After installing you can start via
using PlutoUI
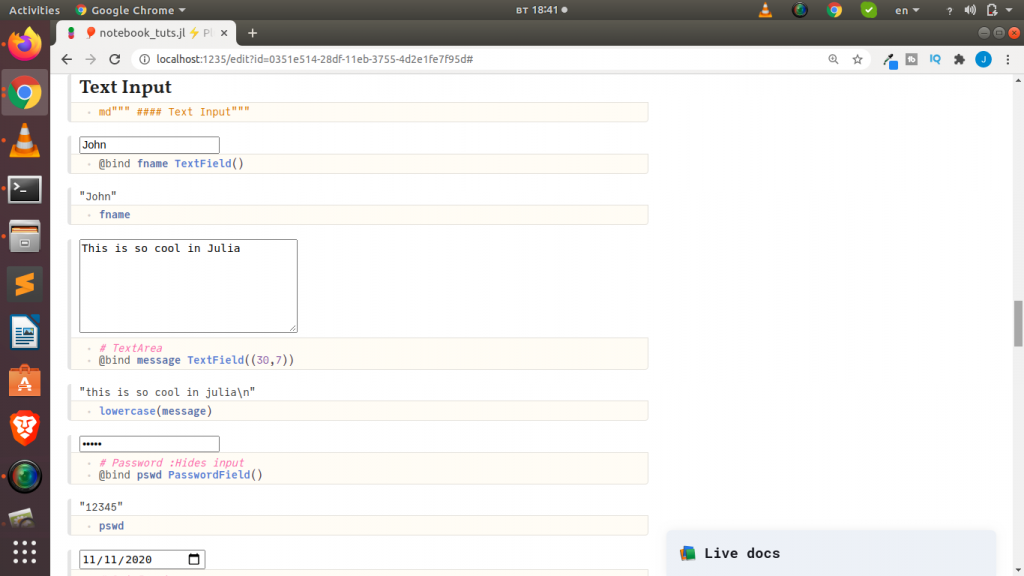
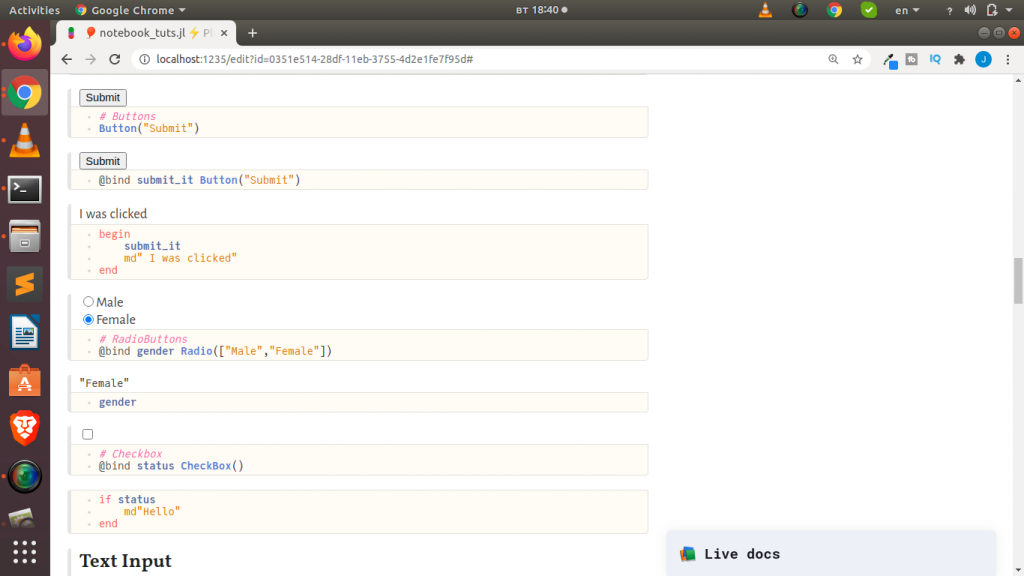
With PlutoUI, you can use several widgets such as text input widgets, buttons,sliders,select and multiselect as well as file picker and more.
To view all the various widget you can use the varinfo() function (similar to dir() in python) .
varinfo(PlutoUI)
| name | size | summary |
|---|---|---|
| Button | 184 bytes | DataType |
| CheckBox | 184 bytes | DataType |
| Clock | 200 bytes | DataType |
| ColorStringPicker | 184 bytes | DataType |
| DateField | 200 bytes | DataType |
| DownloadButton | 192 bytes | DataType |
| Dump | 0 bytes | typeof(PlutoUI.Dump) |
| FilePicker | 184 bytes | DataType |
| LocalResource | 0 bytes | typeof(PlutoUI.LocalResource) |
| MultiSelect | 208 bytes | DataType |
| NumberField | 232 bytes | DataType |
| PasswordField | 184 bytes | DataType |
| PlutoUI | 170.327 KiB | Module |
| 0 bytes | typeof(PlutoUI.Print) | |
| Radio | 208 bytes | DataType |
| RangeSlider | 248 bytes | DataType |
| RemoteResource | 296 bytes | DataType |
| Resource | 296 bytes | DataType |
| Select | 208 bytes | DataType |
| Show | 232 bytes | DataType |
| Slider | 240 bytes | DataType |
| TextField | 208 bytes | DataType |
| TimeField | 200 bytes | DataType |
| WithIOContext | 192 bytes | DataType |
| as_html | 0 bytes | PlutoUI.var”#54#55″{MIME{Symbol(“text/html”)}} |
| as_mime | 0 bytes | typeof(PlutoUI.as_mime) |
| as_png | 0 bytes | PlutoUI.var”#54#55″{MIME{Symbol(“image/png”)}} |
| as_svg | 0 bytes | PlutoUI.var”#54#55″{MIME{Symbol(“image/svg+xml”)}} |
| as_text | 0 bytes | PlutoUI.var”#54#55″{MIME{Symbol(“text/plain”)}} |
| with_terminal | 0 bytes | typeof(PlutoUI.with_terminal) |
Using the widget is quite easy and you can even use the @bind macro to bind the widget to a variable in order to store the result or value and use in another place.
#  Text Input bond to the variable 'fname'
@bind fname TextField()
You can check the video tutorials below
Displaying Results In Pluto Notebooks
One surprising thing about Pluto Notebooks for now (as of November 2020) is that using print,println or show or display doesn’t render the result in the pluto notebook cells but rather in the terminal as stdout.
In order to see your result in the cell you can use the PlutoUI with_terminal() widget or the Print() function to enable you to see your result
Let us explore these methods
Method 1:
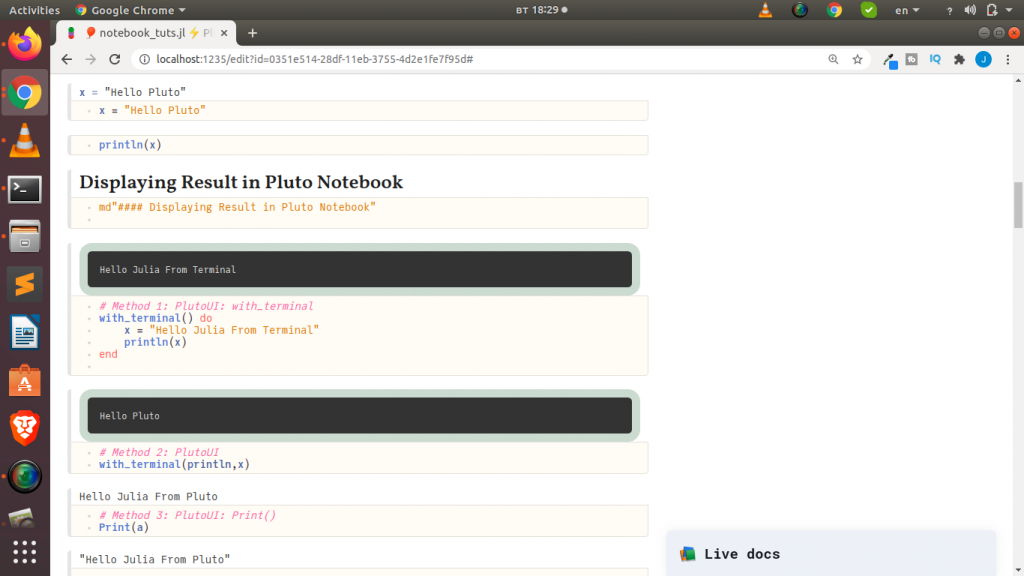
# Method 1: Using PlutoUI: with_terminal()
with_terminal() do
    x = "Hello Julia From Terminal";
    println(x)
end
# Or
with_terminal(println,x)
# Method 2: PlutoUI: Print()
Hopefully in the future versions of Pluto we will be able to get this feature.
Thanks For Your Time
Jesus Saves
Jesse E.Agbe(JCharis)