Notifications and pop ups are very useful tools that are used by habit-forming products.
In this tutorial we will explore how to use ntfy and schedule together to enhance our work as developers and software engineers. From the names of these two python libraries you can infer what they do. Let us first install these package and begin.
Installation
The ntfy library comes with several addons or plugins that integrate with other third party packages so that we can receive notification from desktop,mobile phones (android,etc) and the terminal. In order work with any of theses addons you can install it alongside as below
pip install ntfy
pip install ntfy[pid,emoji,telegram,slack]
The schedule library is for scheduling task in python and we can easily install it with pip as below
pip install schedule
Sending Notification From the Terminal
ntfy comes as a CLI, hence you can run it from the terminal and you can also combine it with other CLI programs. Let see how to do that. To send a notification from the terminal you can do the following
ntfy send "Hello First Notification"

You can also specify the backend you want to use using the -b option however you will have to install the respective addon/plugin. A simple example using the linux backend (default for my system since I am running on Kali-Linux) is as below

This is okay but let us do something useful and practical. We can combine ntfy with other programs in the following ways
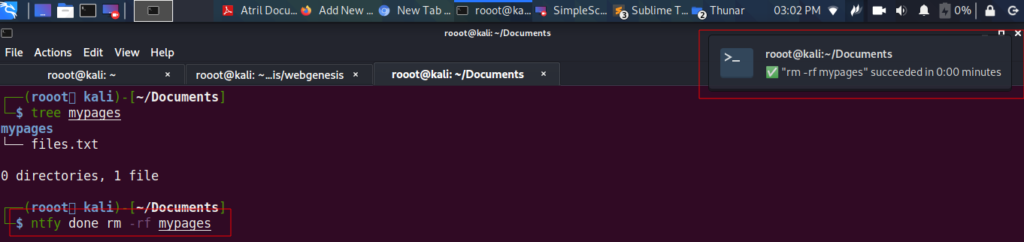
Method 1: using ntfy done <your command/program>
We will attempt to remove a directory with files and then send a notification when the action is completed
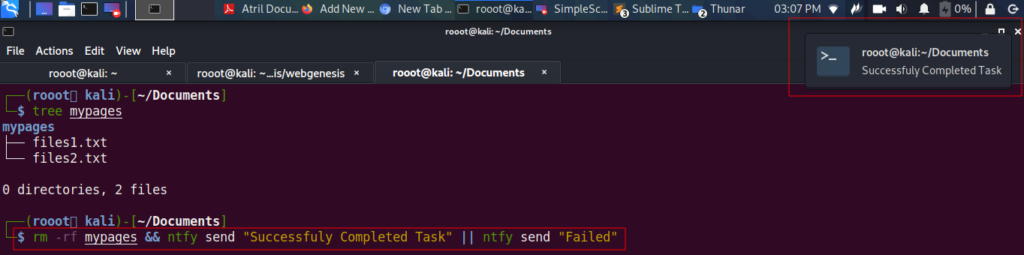
Method 2: using && and II with ntfy send
This method combines normal linux && condition with ntfy send.
rm -rf mypages && ntfy send "Successfuly Completed Task" || ntfy send "Failed"
Having seen how to use ntfy we can now combine it with schedule.
Using ntfy with Schedule for Notifications
There are two main ways we can perform this. Both approaches require you to use suprocess or sys module to handle the ntfy aspect of the task. We will create a function that creates files using the timestamp . Let’s call the name of the function touch – this is equivalent to touch in linux bash terminal.
import os
import time
timestr = time.strftime("%Y%m%d-%H%M%S")


def touch(path):
    with open(path, "a"):
        os.utime(path, None)
Next we will work on the schedule aspect of our task. The job function implement the file creation and we will parse it to the .do()` method of schedule as below. This runs every 10 seconds or you can also use the alternative of running the task until a specific time using the .until("17:30").do(job) methods.
import schedule
import subprocess

## Method 1: combining ntfy with schedule using subprocess
def job():
	filename = "my_file_{}.txt".format(timestr)
	touch(filename)
	print("Created New File: {}".format(filename))
	subprocess.call(['ntfy','send','Task Completed Created File'])

# schedule.every(10).seconds.do(job)
schedule.every(10).seconds.until("17:30").do(job)


while True:
	schedule.run_pending()
Sending Notification When Schedule is done
Additionally you can create a function that sends a message to you when your task is done from schedule as shown below
#mytask.py

import schedule
import subprocess

# Method 2:
def job():
	filename = "my_file_{}.txt".format(timestr)
	touch(filename)
	print("Created New File: {}".format(filename))

def send_notification():
	subprocess.call(['ntfy','send','Task Completed Created File'])

schedule.every(10).seconds.until("17:30").do(job)
schedule.every().day.at("17:31").do(send_notification)

while True:
	schedule.run_pending()
You can now run this python file mytask.py from your terminal like this
python3 mytask.py
We have seen how to use ntfy and schedule together. You can also check out the video tutorial below.
Thank you for your Attention
Jesus Saves
By Jesse E.Agbe