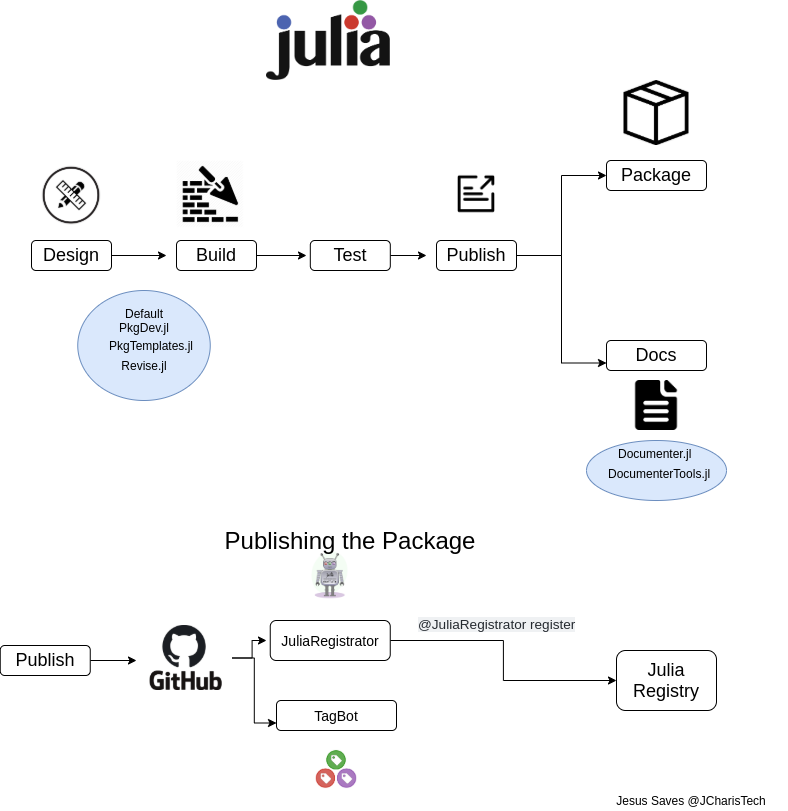
Julia is an exciting and fascinating programming language like Python and R and Go. It offers several benefit if you are into scientific computing and Datascience. In this tutorial we will explore how to develop and publish Julia Packages. We will using this simple workflow for designing our package. This describes everything that we will need.
By the end of this tutorial you will learn
- How to Create A Package in Julia
- Methods for Designing A Production Ready Package in Julia Language
- How to Test Your Packages
- How to Publish Your Package
- How to Create Documentation For your Package
- etc
Let us start.
The basic workflow for package development involves the Design and Build Stage, Unit Testing Stage, Publishing of Package and Documentation stage .
Creating A Package In Julia
A package in Julia is simply , any file with the .jl extension that consist of a collection of related or unrelated functions in a format of a module. A package is a collection of one or more hierarchically connected modules. In short a Julia package has this hierarchy
Julia Package: a collection of modules
--- Module: a collection of functions
  -- Functions & Variables
A package must have a purpose and a unique name that follows the accepted naming convention. It must be in Titlecase or CamelCase eg Mypackage.jl or MyPackage.jl,
To make it practical we will design a simple for fixing contractions.
First of all we will have to have a unique name so we can search the two main places where julia packages are registered. Once the name is available we can pick up that name.
Designing the Package
There are two main ways to create packages in Julia.
Default Method
This involves going to the package mode via the ] and then with the following command generating a package project.
] generate MyPackage
From there you can change into that directory and activate the environment using the activate . command.
cd MyPackage
activate .
From there you can write the code for your package in the mypackage.jl file inside the src directory. The basic structure of a Julia Package looks like this
module ModuleName
export myObjects # functions, structs,etc directly available once `using ModuleName` is typed

[...module code...]
[... functions ...]

end
There is also a test directory for unit testing your package.
PkgTemplate Method
This is the recommended method for now as it makes developing of the package easier and feasible to meet the accepted standard for the Julia Registry.
To use this method you will have to install the PkgTemplates.jl package. And then create a template with the necessary command as below. The dir=”.” means create the project structure in the current directory which is better and simpler.
using PkgTemplates

t = Template(
    user="yourgithubusername",
    dir=".",
    julia=v"1.5.0",
    plugins=[
        License(; name="MIT"),
        Git(),
        GitHubActions(),
        Codecov(),
        Documenter{GitHubActions}(),
    ]
)
This is the template which PkgTemplates.jl it will automatically generate a standard project like below for your package.
To generate the package from the above template variable you can use
t("MyPackage")
In our case we will change the MyPackage to our package name eg
t("Contractions")
This will generate the following project structure.
├── docs
│   ├── make.jl
│   ├── Manifest.toml
│   ├── Project.toml
│   └── src
│       └── index.md
├── LICENSE
├── Manifest.toml
├── Project.toml
├── README.md
├── src
│   └── Contractions.jl
└── test
    └── runtests.jl
The main folders/directories include the src where your actual source code for the package will reside and the docs where the documentation for your package will reside.
The Project.toml file contains the configuration used when publishing your package as well as your documentation/docs.
Testing Your Package
Both the Default method and the PkgTemplates provides a test directory with a runtests.jl file. This file is important as it makes it easy to run all your test together. It is important that you keep the name as it is or include all your unit test scripts inside this runtests.jl file.
For our project we will write a simple test as below
using Test
using Contractions


@testset "Contractions.jl" begin

    doc1 = "he'll be here so I can't|
    @test Contractions.fix_contractions(doc1) == "he will be here so i cannot "
end
To run the test you can type test in your activated environment
pkg> activate .
(Contractions) pkg> test
Once all your test has passed you are now ready to build and publish your Julia Package.
Publishing Your Julia Package
In order to publish your package it is recommended that you push it to a version control platform such as Github or Gitlab. The name of the repository must correspond to the name of the package with the .jl extension eg.MyPackage.jl should be the name on your github repository. In our case with the Contractions.jl package we will use the repo name Contractions.jl.
Most of Julia Packages are hosted as open source packages on Github. As a matter of fact every Julia Package you can install with Pkg.add() is being hosted on the JuliaRegistries General repository on Github.
There are three main requirement for publishing your Julia Package to the official registry. These include
- complying to the standard package structure
- opening an issue on your repo with the term
@JuliaRegistrator register - tagging your package with the appropriate version. This you can do it manually or via the
Julia Tagging Bot.
In case you make changes to your package you can push it to your github after commit it with this commit message
git commit -m "@JuliaRegistrator register"
This will automatically trigger the JuliaRegistrator and Tag Bot to continue with the rest of the process.
You will have to wait for about 3 days before you can see your package global, I mean officially a Julia package after it has meet all the checks for the Julia Registry.
We have seen how to design,develop and publish a Julia package. You can also check out the video tutorial below.